Version: v2.7
Table of contents
i) Terms of agreement
ii) Downloads
iii)Change Log
1) Converting to CID52 (if required)
2) Backing up GDFS
3) Flashing the firmware
4) Customizing your phone
5) Uploading files via FSX *optional*
*) Recovering from a bad flash
i) Terms of agreement
By following this guide I take no responsibility for any damage caused to your handset while doing so, having said that, it is very unlikely that you will.
Furthermore, You Will Lose All Data When You Flash So Use MyPhoneExplorer To Backup Up Everything You Want (even messages, notes, calender, contacts, files etc.). Download MyPhoneExplorer Here
If you do not agree to these terms leave this page now.
ii) Downloads (Direct Links):
SEMC USB Flash Driver (32-Bit And 64-Bit)
XS++ v3.1(Darwin)
Please download all of these files before proceeding.
iii)Change Log
v1.0 Step By Step Tutorial
v1.1 Broken Images Fixed
v1.2 Method For FSX Corrected
v1.3 Few Grammar Mistakes Corrected
v1.4 Screenshot Of Upgrade To CID52 Added
v2.0 Detailed Instructions On Uploading Files Via FSX Added Upon Numerous Requests
v2.1 Images Compresses By 40% For Faster Loading Specially For Our Dial-Up Friends. New Page Size 1.21mb
v2.2 All Images Restored
v2.3 Images Further Compressed By 30%. New Thread Size 887kb
v2.4 Added Jasmins Tutorials Link On How To Install USB Flash Driver
v2.5 XS++ Logo Added
v2.6 Broken Links Fixed
v2.7 Direct Links Added
1) Converting to CID52 (if required)
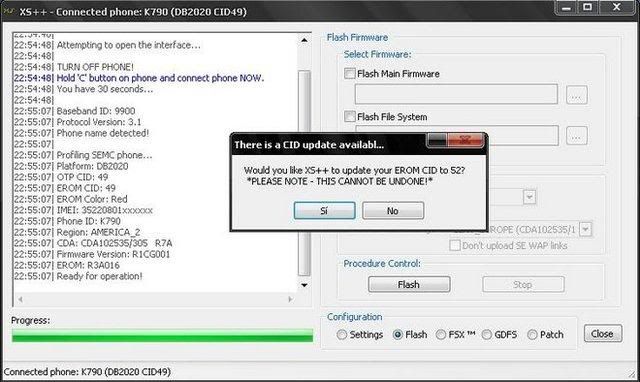
If XS++ detects a DB2020 CID49 or CID51 phone, it will automatically ask if the user wants to upgrade. See The Screenshot Below:
CAUTION!!! If You Upgrade To CID52, You Can Not Revert Back To CID49 Or CID 51.
2) Backing up GDFS
Backing up the GDFS isn't something which necessarily has to be done when flashing firmware, but it is a very good way to ensure you don't damage your phone beyond repair.
Step 1.
Take battery out of phone and put back in (do not turn phone on). Open XS++ and click Connect. Hold down the "C" button on the phones keypad and connect the USB cable. If this is the first time you flash your phone you will need to install the Flash drivers I posted further up. If You Have Any Problems Doing So, See This Tutorial For Detailed Instructions On Installing USB Flash Drivers.
Step 2.
Click on the GDFS tab as shown in the picture.
Step 3.
Click "Backup GDFS" and wait (shouldn't take more than about half a minute).
Step 4.
Done :)
3) Flashing the firmware
Step 1.
Take battery out of phone and put back in (do not turn phone on). Open XS++ and click Connect. Hold down the "C" button on the phones keypad and connect the USB cable.
Step 2.
Select the firmwares (make sure you extract them first) by clicking the "..." buttons or simply dragging the file from the explorer to the box (don't get mixed up with FS and MAIN).
Click "Flash" and wait (this takes a while, 6-7 minutes is normal).
Step 3.
Flashing is done, you can breathe now
4) Customizing your phone
Compulsory if flashing FS
Step 1.
Take battery out of phone and put back in (do not turn phone on). Open XS++ and click Connect. Hold down the "C" button on the phones keypad and connect the USB cable.
Step 2.
Tick “Customize File System”, select model and region/CDA, click flash.
Click Here For Picking Right Region And CDA
Step 3.
Done.
5) Uploading files via FSX *optional*
FSX can be used as a way of customizing your handset just like step 4. This would be done if a user had a custpack they wanted to use which wasn't in XS++ yet or adding or changing cam drivers, acoustics, disp driver's etc.
Some Important Things You Need To Know Before Using FSX:
A: You cannot 'download' files from your phone.
B: Smartphones are not supported by the FSX function.
C: You cannot mark multiple files.
D: You cannot delete folders.
E: I've included a list of most used files in the end of this FSX section.
F: Files are overwritten if you upload a file with the same name..
(You don't have to delete all the acoustic file before uploading new ones)
Step 1.
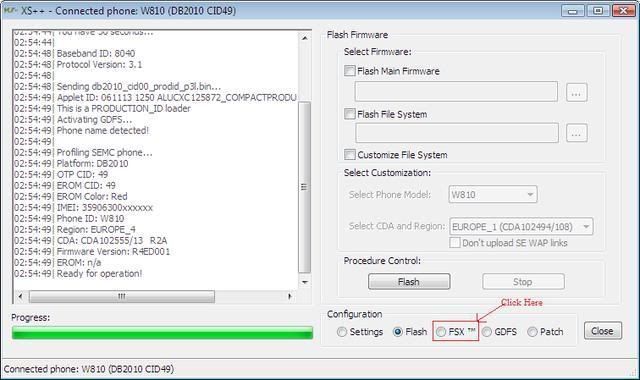
Open XS++ And Hit Connect. Remove And Reinsert Yor Battery And Connect Pressing "c" Button. Then Hit FSX Under Configurations.
Step 2.
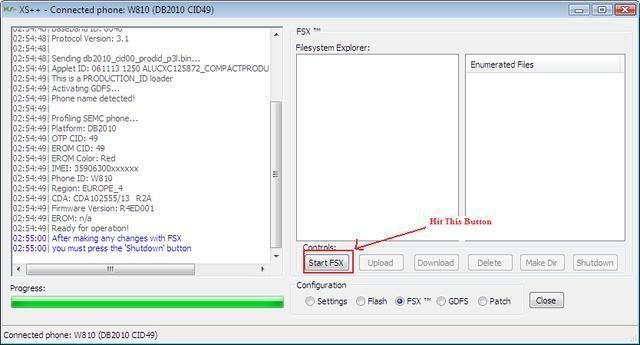
Press 'Start FSX'. Now, XS++ will load all the files and paths at once. Please have patience, this WILL take some time..
(normally a minute or two OR three!)
Step 3.
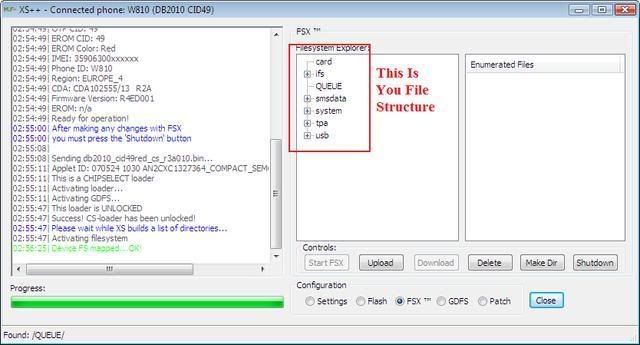
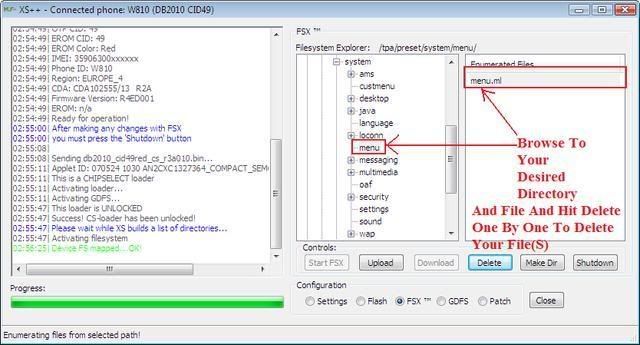
Now You Will See The File Structure Like Below.
Step 4.
Navigate in the FS using the FSX, once you have found a file you want to delete, mark it, and press 'DELETE'.
Step 5.
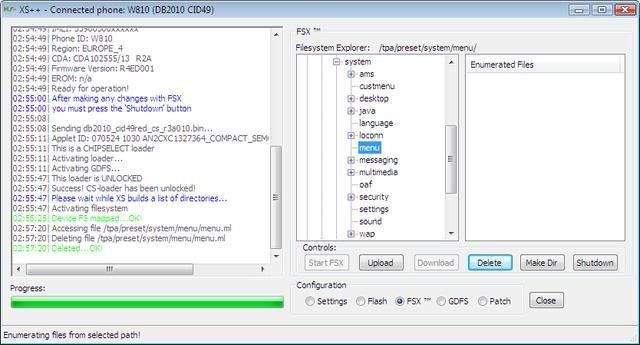
Your Particular File Will Be Deleted.
Step 6.
Now Upload The Desired File. You May Use:
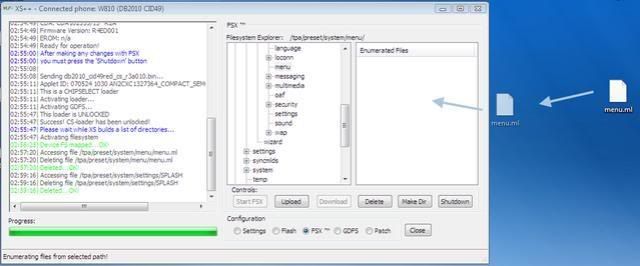
i) The Drag-And-Drop method, navigate and select the folder you want to upload the file(s) to, mark all the files, and move them over to "Enumerated Files"
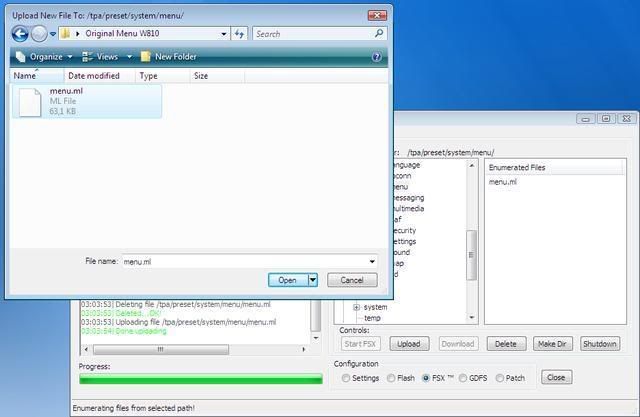
ii)The Upload Method. Press 'UPLOAD', navigate to the file(s) you want to upload, mark them, and press 'OPEN'.
Step 7.
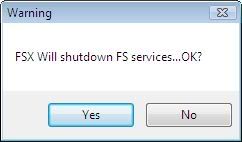
Remember, after doing stuff using FSX, press SHUTDOWN!
Press 'YES' on the box that appears.
Some Common Used Files Location List:
;Acoustic Files -> 'IFS/SETTINGS/ACOUSTIC'.
;Display Driver -> 'IFS/SETTINGS/DISPLAY'.
;Camera Driver -> 'IFS/SETTINGS/CAMERA'.
;Custpack -> 'TPA/PRESET/CUSTOM'
;Menu -> 'TPA/PRESET/SYSTEM/MENU'.
;Flash Menus -> 'TPA/PRESET/SYSTEM/DESKTOP/FLASH'.
;System Sounds -> 'TPA/PRESET/SYSTEM/SOUND'
;Language -> 'TPA/SYSTEM/LANGUAGE'
;Layout -> 'TPA/SYSTEM/LAYOUT'.
;Startup/Shutdown Stuff -> /TPA/PRESET/SYSTEM/SETTINGS
;SPLASH - Bootup Picture, it must be a .GIF or .PNG file without extension.
;STARTUP_IMAGE_SEMC -> Startup Image, Animated GIF image without extension.
;SHUTDOWN_IMAGE_SEMC -> Shutdown Image, Animated GIF image without extension.
;STARTUP_SOUND_SEMC.mp3 -> Startup Sound, MP3 Format.
;SHUTDOWN_SOUND_SEMC.mp3 -> Shutdown Sound, MP3 Format.
;Locked Java Apps/Games -> /TPA/PRESET/SYSTEM/AMS
;Locked Java Apps/Games -> /TPA/PRESET/DEFAULT/JAVA
;Locked Music -> /USB/AUDIO
;Locked Music -> /TPA/USER/AUDIO
;Locked Music -> /TPA/PRESET/DEFAULT/AUDIO
;Locked Pictures -> /USB/IMAGE
;Locked Pictures -> /TPA/USER/IMAGE
;Locked Pictures -> /TPA/PRESET/DEFAULT/IMAGE
;Locked Themes -> /USB/THEME
;Locked Themes -> /TPA/USER/THEME
;Locked Themes -> /TPA/PRESET/DEFAULT/THEME
*) Recovering from a bad flash
*WARNING* flashing a GDFS that did not originally come from that exact handset may have severe consequences. By exact handset I mean your handset, not your friends unlocked handset, YOUR HANDSET!
If a flash goes bad, two things need to be done:
1. You need to flash the firmware for the model you had before (when you did the GDFS backup), and
2. You need to restore GDFS.
For flashing follow from step 3 above. Do the GDFS restore after flashing and customizing the handset.
Step 1.
Take battery out of phone and put back in (do not turn phone on). Open XS++ and click Connect. Hold down the "C" button on the phones keypad and connect the USB cable. If this is the first time you flash your phone you will need to install the Flash drivers I posted further up.
Step 2.
Click on the GDFS tab as shown in the picture.
Step 3.
Select the backup you wish to restore. Click “Write GDFS”.
Step 4.
Done :)
Share Your Experiences And Please Feel Free To Press Thanks ButtonIf You Like This Post.
BRGDS
Muhammed Umer
Results 1 to 10 of 840
-
12-24-2007 #1
XS++ 3.1 Guide-Flashing, Customizing, Recovering
Last edited by mohdumer; 08-05-2008 at 01:18 PM. Reason: Direct Links Added
The Following 334 Users Say Thank You to mohdumer For This Useful Post:
00001111, 300Shooter, 36987, adeonir, ahlock, airfoil, ajunkzy, akudan, albo6, alexjanjic, ama95, amas, ammitz, Andres3d, andrew84uk, anespatel, angajsi, Angel19, anima71, ankitg2006, anshar, arvin393, asas, AST, avi810, awqi_zar, axristos, ayman_zxcv, azeemiqbal, babsi, BAGMAN, bahtit, banhmi_pat, benck, bibia, bicky86, BlsDiscipl, bluepay, bojanbl, boka_maryo, BoogieTrai, bruno-1-, Buddy77, Busy45, Callsign~, camp, catalin123, catalin24, chanyunsum, cheeryy89, CL6, commando, comthre3, cookiez, custom08, da95, dadawawa, danny90, DannyN, dany07rap, DarthErics, dazuk1972, delax2006, denbeutels, depolo08, Dervmonste, despotic, dima0969, divad, doink1955, dsii, duke2k7, edyshor, elias.albe, enjo, ev0luc, Fabiosky65, farhaj, fiish, Fmyfriend, Forciie, gamerusin, garyangi, GIGATT, gqeu2002, gr8time, Greight, grissom, Gwyndwr, hackervt, hakko, hare115, honortheex, iacura001, iamsinned0, IanW, idumbakuma, ihate118, Indy, Intercepto, Jajaj, Janzour, jasen52, JaVIsH, jburn, jcarlos_7, jeyan kill, Jmih, JPH, jrsmooth, jsg1994, kamaln, kamel_007, keekokeeko, kenji06, khli2001, kidkree1, kikodog, kobi07, kokiw700i, KoonaiBhai, koonak, kpalesha, Krizak, ktol, kushalsoni, Lankanboy1, larko, letal3891, lionheart7, LoveK790a, lucianu, lutfi14, m-melina, ma._, macka12358, majstor, Manivel, margo, marshymars, mauasca, max, maximus515, meeks_101, meikobobo, mhurubber, micmic, mic_mic, mikeisback, mirciu, mogkupo, momoki, MosaGsm, mov007, mr_vodoo, mumum_08, nabil3h, nawalage, Nazgulled, NekiTamo, neN3i, neofytos, Nerozx, ngolam12, nhatkha, nongmobile, Norshius, NOR_Andrsn, ocuonline, ODEN, Ollohallo, pampi, Pandanl, panosbac, paradox, parsa_cs, PhoneNOOB, pig_tale, plamen_10, pompiste, ptuj, quangvuhee, rac.NET, RAZTAZ, realworks, redforest, ric20007, richard102, Rickerys, riqlock, rogerbrain, rok0191, rom10, romedo, rovtar, safdar001, secondclaw, shaeie3g, sharankuma, sharat147, shivram, shpa4ina, skatepig, sly68, sl_rohit, smajo, SMD, smorgar, snk951, soularav, soulmf, sovereignt, Spleshmen, sreerij, srmd, SSyar, SuFLo, surushm, system32, s_n_b, ta5cug, Thangnhoc, theGalis, theinsider, thyrael, tomred, tongwai, tonywong41, toothfish, tory, UEDan, unexpected, unixlink, unni_cris, usay, vidmag, voidance, WEAF, webfree, willycox42, wledw, x800, xan K, xinvux, XPrinCe, XRaYdeR, xrobelx, yogi028, YouGee, zvolkov
12-24-2007 #2Banned
- Join Date
- May 2007
- Device
- c702 (speed black) & s700
- Posts
- 597
- Thanks
- 34
- Thanked 272 Times in 111 Posts
sticked, could you please fix the broken images and the xs++3.1 fsx doesn't work like that it works like far manager, you browse around and upload the files you want by drag & drop or press the upload button.
The Following 3 Users Say Thank You to ts014 For This Useful Post:
12-24-2007 #3Images Are Not Broken. You Can See The Scroll Bar Below The Thread. However I'll Be Resizing Them Soon. Whereas Thanks For FSX. Actually I Pasted The Method For XS++ v1.6.8 And I'll Fix It.
Last edited by mohdumer; 12-25-2007 at 06:37 AM.
The Following 2 Users Say Thank You to mohdumer For This Useful Post:
12-25-2007 #4Member
- Join Date
- Dec 2007
- Device
- -
- Posts
- 20
- Thanks
- 8
- Thanked 15 Times in 7 Posts
nice tutorial....
i connect my k800i to the XS++ 3.1, and the program show me this :
17:12:14| Profiling SEMC phone...
17:12:14| Platform: DB2020
17:12:14| OTP CID: 49
17:12:14| EROM CID: 52
17:12:14| EROM Color: Red
17:12:14| IMEI: 35170701xxxxxx
17:12:14| Phone ID: K800
17:12:14| Region: APAC
17:12:14| CDA: CDA102568/101 R5A
17:12:14| Firmware Version: R1KG001
17:12:14| EROM: R3A016
17:12:14| Ready for operation!
17:12:31| ~~~~~~~~~~ Custpack information ~~~~~~~~~~
17:12:31| Custpack: EUROPE_4 (CDA102511/101) (K800)
17:12:31| Generic(non-branded) custpack: Yes --------> what is this??
17:12:31| Allowed languages: en, da, fi, is, sv, no,
17:12:31| ~~~~~~~~~~~~~~~~~~~~~~~~~~~~~~~~~~~
17:12:37| ~~~~~~~~~~ Custpack information ~~~~~~~~~~
17:12:37| Custpack: APAC (CDA102568/101) (K800)
17:12:37| Generic(non-branded) custpack: No -----------> what is this?
17:12:37| Allowed languages: en, ms, id, tl, vi, zs,
17:12:37| ~~~~~~~~~~~~~~~~~~~~~~~~~~~~~~~~~~~
and what version i must use for my k800i??? thx in advance
12-25-2007 #517:12:14| EROM Color: Red
17:12:14| IMEI: 35170701xxxxxx
17:12:14| Phone ID: K800
17:12:14| Region: APAC
Your phone is APAC, so you MUST use an APAC cust pack. You cannot use an EMEA custpack.
Are you sure the APAC custpack is not a branded one? Try using another APAC cust pack since this might be a "branded" one..like orange or vodafone branded.
12-25-2007 #6Member
- Join Date
- Dec 2007
- Device
- -
- Posts
- 20
- Thanks
- 8
- Thanked 15 Times in 7 Posts
im sure my k800i isnt a branded one..
so it's safe to use this (XS++ provide it):
17:12:37| ~~~~~~~~~~ Custpack information ~~~~~~~~~~
17:12:37| Custpack: APAC (CDA102568/101) (K800)
17:12:37| Generic(non-branded) custpack: No -----------> what is this?
17:12:37| Allowed languages: en, ms, id, tl, vi, zs,
17:12:37| ~~~~~~~~~~~~~~~~~~~~~~~~~~~~~~~~~~~
12-25-2007 #7
12-25-2007 #8Yes Its Safe To Use And Dont Worry For "Custpack: No". It Is If You Want To Add Your Own Custpack Like If You Want To Convert Your Phone To K800 Casino Royale Edition So You Will Use That Custpack. Since You Dont Need It So You Dont Need To Worry.
Go Ahead.
12-25-2007 #9Member
- Join Date
- Dec 2007
- Device
- -
- Posts
- 20
- Thanks
- 8
- Thanked 15 Times in 7 Posts
Ok thx.. in other words i dont need to download such custpack coz XS++ already provide it,..
and where i can get this file for quick, I need these file ASAP :
K800_R8BA024_FS_APAC_RED52
K800_R8BA024_MAIN_GENERIC_WI_RED52
are these file safe or right for my phone??
thx again in advance.. sorry for bad english.. hehe:D
The Following 3 Users Say Thank You to 00001111 For This Useful Post:
12-25-2007 #10You Need To Download Them From Download Area But As I Can See You Cant Access Dowload Area Since You Dont Have 20 Messages And Neither You Have Passed Two Months After Registartion. And I Would Be Glad To Help You But I Cant Since Sending Files From Download Area Is Against TopSony Terms. So Get Files From Download Area Ethitically.
Thread Information
Users Browsing this Thread
There are currently 2 users browsing this thread. (0 members and 2 guests)
Tags for this Thread






 Reply With Quote

